Today we’re continuing our series on building your first WooCommerce plugin with an article on how to create a WooCommerce widget for your store.
Widgets and shortcodes are great tools to let users output some information on the frontend of their eCommerce site, and they’re fairly easy to build and include as part of your plugin. We’ve already written about creating a shortcode for your site, so today we’ll focus on building a basic widget, with a more advanced widget tutorial to follow.
Our basic widget will always be displayed, and can be used on any widget area of the site.
WooCommerce Widget Components
There are a few basic pieces to any widget, which the WordPress codex and details on using register_widget can give you an overview of. However, these don’t explain in detail what each function in the widget does, so we’ll take a look at each in more detail.
If you’re looking for a sample to follow, the core text widget is a good example.
The Widget Class
The main piece of your widget will be creating a class that extends the WP_Widget class. This will let you extend all of the basic components of a widget, but change the pieces you need to, such as the title and what’s output on the frontend. There are 4 functions that this class must contain:
public function __construct: This function will “set up” your widget, and there are helpful details in the WP_Widget docs. You can optionally set options, then instantiate the widget. The general format for instantiating your widget:
parent::__construct( 'Widget_Classname', __( 'Widget Title (for users)', 'textdomain' ), $options );
Here’s what our shipping widget will use:
public function __construct() {

    // set widget options
    $options = array(
        'classname'   => 'widget_wc_active_shipping', // CSS class name for this widget
        'description' => __( 'Displays a list of active shipping methods for your shop.', 'wc-active-shipping-widget' ),
    );

    // instantiate the widget -- use your widget's class as the first param here
    parent::__construct( 'WC_Active_Shipping_Widget', __( 'WooCommerce Active Shipping Methods', 'wc-active-shipping-widget' ), $options );
}
public function widget: This function will accept 2 parameters: $args and $instance. The $instance is the array of settings for the widget instance, while $args is the array of display arguments (such as before_title, after_title, etc), which are typically used by themes to format widgets, so you should include these.
The basic structure of this function should look something like this to include the display arguments properly:
public function widget( $args, $instance ) {

    // get the widget's configured title
    $title = $instance['title'];

    echo $args['before_widget'];

    if ( $title ) {
        echo $args['before_title'] . $title . $args['after_title'];
    }

    // This is where you add what your widget should output
    // Add your widget's magic here

    echo $args['after_widget'];
}
For our shipping widget, we’ll output a list of methods here. We’ll get the shipping methods (from another function that we’ll address in a bit), and if there are methods to show, we’ll show them in a list:
public function widget( $args, $instance ) {
    // Get the active methods and bail if there are none
    $methods = $this->get_active_shipping_methods();
    if ( empty( $methods ) ) {
        return;
    }

    // get the widget configuration
    $title = $instance['title'];
    $added_text = $instance['text'];

    echo $args['before_widget'];

    if ( $title ) {
        echo $args['before_title'] . $title . $args['after_title'];
    }

    // Show the additional text if set
    if ( $added_text ) {
        echo '<p>' . wp_kses_post( $added_text ) . '</p>';
    }

    // Start active shipping method list
    echo '<ul>';

    foreach ( $methods as $method ) {
        echo '<li>' . $method . '</li>';
    }

    echo '</ul>';
    // End shipping method list

    echo $args['after_widget'];
}
public function update: This function handles updating our widget instance with any settings configured by the user. For example, this can let the user set the widget title, or some other part of the widget (such as display text). This function accepts the old settings for the widget, then updates them with the new settings entered by the user.
The general format takes every setting from the $instance (which we’ll create next) and updates them with whatever the user has entered. You’ll need to update each setting individually.
public function update( $new_instance, $old_instance ) {

    $instance['setting1'] = strip_tags( $new_instance['setting1'] );
    $instance['setting2'] = strip_tags( $new_instance['setting2'] );
    return $instance;
}
Our shipping plugin will look like this:
public function update( $new_instance, $old_instance ) {

    $instance['title'] = strip_tags( $new_instance['title'] );
    $instance['text'] = strip_tags( $new_instance['text'] );
    return $instance;
}
public function form: The final function needed to create our widget is the form for settings, which passes in the $instance array (the settings array). This will include a label and field for any setting / field the widget should contain. This can be the widget title for the user to set, and any other field, such as textareas, selects, or checkboxes.
Our shipping method widget will use two fields in its form: “title” and “text” for additional text:
public function form( $instance ) {
    ?>
    <p>
        <label for="<?php echo esc_attr( $this->get_field_id( 'title' ) ); ?>"><?php _e( 'Title', 'wc-active-shipping-widget' ) ?>:</label>
        <input type="text" class="widefat" id="<?php echo esc_attr( $this->get_field_id( 'title' ) ); ?>" name="<?php echo esc_attr( $this->get_field_name( 'title' ) ); ?>" value="<?php echo esc_attr( isset( $instance['title'] ) ? $instance['title'] : '' ); ?>" />
    </p>

    <p>
        <label for="<?php echo esc_attr( $this->get_field_id( 'text' ) ); ?>"><?php _e( 'Additional text', 'wc-active-shipping-widget' ) ?>:</label>
        <textarea class="widefat" rows="3" cols="20" id="<?php echo esc_attr( $this->get_field_id( 'text' ) ); ?>" name="<?php echo esc_attr( $this->get_field_name( 'text' ) ); ?>"><?php echo esc_textarea( $instance['text'] ); ?></textarea>     </p>
    <?php
}
Once you’ve added each of these functions to your widget, you can end that class, and now all we have to do is register the widget.
Registering the WooCommerce Widget
In order to add your widget to your site, you’ll need to register it, hooking into widgets_init to do so. This is the easy part 🙂 — register the widget using your widget’s class name, and hook this into widgets_init:
function wc_active_shipping_register_widget() {
    register_widget( 'WC_Active_Shipping_Widget' );
}
add_action( 'widgets_init', 'wc_active_shipping_register_widget' );
Congrats, your widget is done!
Getting WooCommerce Shipping Methods
Since our widget is getting some information from WooCommerce, we need a function to get this information. While a simple widget that just outputs static text wouldn’t need this step, since we have to pull the active shipping methods from WooCommerce, we’re going to add a function to get them.
We’ll get all of the active shipping methods in the shop and add this function to our widget class. We’ll find some help in the WC_Shipping class, as we’ll need to load the available shipping methods and see which ones are active.
The load_shipping_method function is necessary to do so. Shipping methods won’t be loaded already, so we’ll need to load all methods and then check them to see which are enabled.
function get_active_shipping_methods() {

    $shipping_methods = WC()->shipping->load_shipping_methods();
    $active_methods = array();

    foreach ( $shipping_methods as $id => $shipping_method ) {
        // Only get enabled shipping methods and push them into our array
        if ( isset( $shipping_method->enabled ) && 'yes' === $shipping_method->enabled ) {
            $method_title = $shipping_method->title;
            // Append a tag to international delivery in case the name doesn't indicate it
            if ( 'international_delivery' === $id ) {
                $method_title .= ' (International)';
            }
            array_push( $active_methods, $method_title );
        }
    }
    return $active_methods;
}
This is the method I called in my widget class previously to get the WooCommerce shipping methods, which I then looped through and put into my list.
Completed WooCommerce Widget
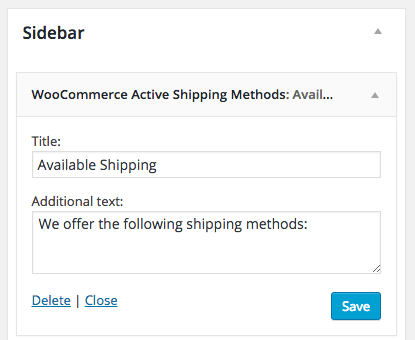
Now we’ll put all of these steps together into a finished piece of code. Our WooCommerce widget has two settings for title and additional text, which the user can adjust:
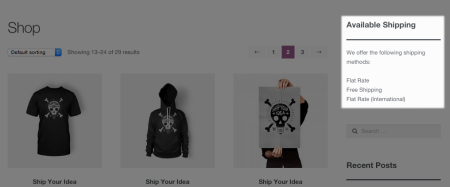
This widget will output the title, additional text, and the list of active shipping methods in the shop using the display label set in WooCommerce:
The full code is available here: WooCommerce Active Shipping Methods Widget
If you’d like to install this WooCommerce widget as a plugin, you can download the zip and upload it to your site:


Hey, this plugin is just what I was looking for, although I can’t get it to work with woocommerce’s storefront theme, any ideas on how to make it compatible?
Nice widget any way to select shipping method via widget and then post that to the cart page and then widget?
Through custom code, anything is possible 🙂 However, that would be some pretty involved code, and not something I have any samples for. If you’re keen to do something like this, I’d recommend checking out Codeable for a quote.