
We’ve covered how to create a WooCommerce widget in a very basic sense in an earlier post in this series. However, there are some more advanced steps we can take to create “smart” WooCommerce widgets for your store.
Creating a “Smart Widget”
If you frequently use WooCommerce widgets, you’ll notice that some of them are displayed only on certain pages. For example, the price filter widget is only displayed on the shop and archive pages, as that’s the only place where that widget would need to be used.
We can use a couple of tools to display widgets only on relevant pages. We’ll need the help of WordPress conditional tags and possibly the is_active_widget function.
Example 1: Storefront theme Post Meta Widget
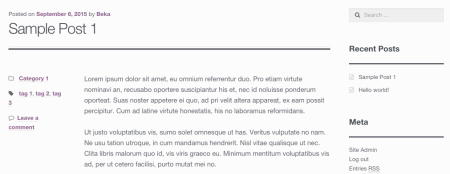
The default Storefront theme blog layout shows the post meta (categories, tags, comment count) to the left of the main content:
We can use a widget to display this post meta in a widget instead so that our blog posts can be full width. Since this widget should only be used on blog posts, we’ll want to hide it when any other content but a blog post is being viewed.
To do so, we’ll first need the help of a conditional tag: is_singular( 'post' )
We’ll begin to set up or widget as we did in our previous tutorial, but since this widget is specific to the Storefront theme, I’ll add a check before I even set up the widget class to bail if we’re not looking at Storefront or a child theme of it:
// Bail if Storefront isn't the active or parent theme
if ( 'storefront' !== wp_get_theme()->template ) {
    return;
}
Now we’re ready to start the widget. The main thing we’ll want to pay attention to first is the widget function, which outputs our widget content. Here’s where we’ll have our conditional check. The first thing we’ll put in this function is a check to see if we’re viewing a blog post. If not, we’ll bail out since this widget only relates to blog posts and shouldn’t be shown otherwise.
public function widget( $args, $instance ) {

    // Only show this if we're looking at a blog post
    if ( ! is_singular( 'post' ) ) {
        return;
    }

    // get the widget configuration
    $title = $instance['title'];

    echo $args['before_widget'];

    if ( $title ) {
        echo $args['before_title'] . wp_kses_post( $title ) . $args['after_title'];
    }

    // Show the storefront post meta
    storefront_post_meta();

    echo $args['after_widget'];
}
We’ll also use the storefront_post_meta() function to output the post meta in our widget since Storefront makes this really easy for us.
Now we’ll move onto part 2: This is showing my post meta in my widget if we’re viewing a blog post, but I also want to adjust my content so that the post is full width and the post meta displayed next to the content is removed (since I’m already showing it in my widget and I don’t need it).
This is where the is_active_widget() check comes into play. I want to remove the post meta added by Storefront, but only if this widget is being shown to take its place. We’ll use both is_active_widget and our check for the post type to only remove the existing post meta information if the widget is taking its place.
public function remove_storefront_postmeta() {
    if ( is_singular( 'post' ) && is_active_widget( false, false, $this->id_base ) ) {
        remove_action( 'storefront_single_post', 'storefront_post_meta', 20 );
    }
}
As a final note, I want to make the post full width. I can’t do this in my stylesheet since the blog archive uses the same CSS as the singular post, so I’ll need to add some CSS conditionally as well. I’ll use the same checks to ensure that I’m only applying these CSS changes if the widget is active and the post should be full width.
public function modify_storefront_blog_posts() {
    if ( is_singular( 'post' ) && is_active_widget( false, false, $this->id_base ) ) {
        echo '<style>
            .hentry.type-post .entry-content { width: 100%; }
            .hentry { padding-bottom: 2em; margin-bottom: 2em; }
        </style>';
    }
}
Now I’ve got a couple of things happening: if my widget is not active, nothing about the theme is changed. If my widget is active, it checks itself to be sure it’s only added to blog posts and that it shows the post meta. The rest of my code is then hooked in later to make the adjustments to the blog layout since the widget takes the place of the post meta.
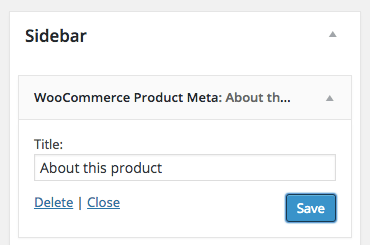
I can add my new widget and add its title:
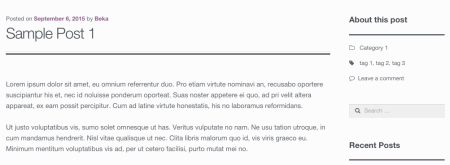
And then once it’s active, my blog posts will change:
Want the full code or an installable plugin? View it here or download a zip.
Example 2: WooCommerce Product Meta Widget
Let’s take the exact same concepts, but apply them to a smart WooCommerce widget instead. By default, the product meta is shown after the “add to cart” section:
We can check for a product page by looking for: is_singular( 'product' ); We can use that in our widget function to bail if we’re not on a product page, and if we are, output the widget content with woocommerce_template_single_meta() to do so.
public function widget( $args, $instance ) {

    // Only show this if we're looking at a product page
    if ( ! is_singular( 'product' ) ) {
        return;
    }

    // get the widget configuration
    $title = $instance['title'];

    echo $args['before_widget'];

    if ( $title ) {
        echo $args['before_title'] . wp_kses_post( $title ) . $args['after_title'];
    }

    // Show the product meta
    woocommerce_template_single_meta();

    echo $args['after_widget'];
}
In the same way we did with the Storefront widget, we can remove the product meta if we’re on a product page and only if this is the active widget. We can then also apply styles as needed.
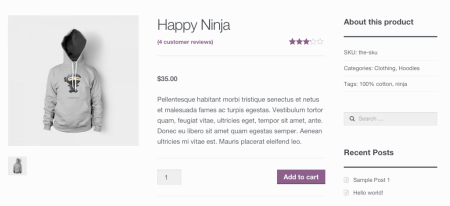
This will give us a modified product page display with meta moved into a widget; my styles and removing the product meta will only occur if this widget is active:
Want to check out the full code for our smart WooCommerce widget? You can view it here, or download it to install as a plugin.


Hello Beca!
Since I started learning & establishing a WooCommerce site from scratch, I have a big fan your blog page. Currently, I am customizing WooCommerce Storefront theme & your blog has been very helpful.
Your recent post on Post Meta Widget (Example: 1)was interesting and thought to give it try. However. in my test I still couldn’t replicate your screenshot as I still get meta above my feature image (see link –
http://shamashop.com/demo/testing-skyverge-post-meta-widget/ ). What did I miss?
Just like your screenshot, I would like to move the meta both from from single posts & main blog page (index.php) to bottom of the post. I prefer your full-page width layout than its original layout.
Thank You & appreciate your any help.
Gan
Hey Gan, glad to hear it 🙂 I’d recommend trying to follow this tutorial instead, which doesn’t use the widget and moves the post meta to the bottom like it looks like you’re trying to do.
Hello Beca,
Thanks for your prompt response. That link brought me to blog.com site but no tutorial. Didn’t I look at properly?
In my earlier post, I meant to refer to your Example 1: Changing Blog Layout (in your post Hooking into WooCommerce Action).
Thanks
Gan
Very nice tutorial, thank you very much.
I would also like to know how to add custom meta boxes to the woocommerce product page (that will be seen when adding a product in the admin) and to add a settings tab to the woocommerce settings page in the admin. I will be happy if you may demonstrate how to do these in another tutorial or part of this series if it continues.
Thank you very much for the wonderful tutorial
Thanks thanks thaaaaaaaaaaanks!!!! you save me! 🙂