
When building your first WooCommerce plugins, it’s a good idea to look at other extensions or WooCommerce core itself for ideas. You’ll notice that many of them take an OOP (object-oriented programming) approach. Rather than being composed solely of functions that take in data, use some logic to manipulate the data, then output data, the code focuses on objects and the properties those objects have.
Objects typically are represented by a class in PHP, which you’re already probably already familiar with. While a lot of basic plugins may just use a class as a way of grouping together the methods the plugin uses, classes can also have their own variables, known as members.
A class member is a piece of data that belongs to a class; this data is a “property” of that class. In fact, class members are often referred to as properties or attributes:
Class member variables are called “properties”. You may also see them referred to using other terms such as “attributes” or “fields”, but for the purposes of this reference we will use “properties”.
– PHP manual
A common example could be a “person” class in a network. A property of this person would be “age”, so $age could be a class member. The class can have a function or method to update this age (ie a function to add a year on the person’s birthday). The age doesn’t have to remain constant, but it belongs to the class object and can be modified or used by any method within the class.
In the realm of eCommerce, things like orders, products, and customers are represented with classes. These objects can have class members that belong to them. For example, an order may have class members for ID, payment method, or total, as these are properties that exist for an order. Products may have members for ID, type, or SKU.
WooCommerce uses this structure, and orders are a great example of using a class member to access data related to the order.
Example 1: Adding Information to the WooCommerce Thank You Page
When an order is placed, it can only have one payment method for the order (WooCommerce does not have split payments in core). The payment method is a class property / member, which is set when the order is placed and / or paid for.
To access a class member, you can do so in a similar way to a class method:
$order->payment_method
(within the class itself, you’ll see $this->property)
Let’s take an example to add some information to the WooCommerce thank you page. This is shown to customers after successfully placing an order. The woocommerce_thankyou action makes the order ID available to us, so we can use this to get the order object.
Once we have the order object, we can access its properties or members, one of which is the payment method used. We can check the value of the payment method, and if it matches the value we want, output some additional text or information for the customer.
/**
 * Add some additional information to the "Order Received" page depending on which
 *   payment method is used
 *
 * @param int $order_id the ID of the WooCommerce order
 */
function sv_wc_add_thankyou_payment_note( $order_id ) {

    // get the order object
    $order = wc_get_order( $order_id );

    // add something to the thankyou page depending on payment method
    switch ( $order->payment_method ) {

        case 'cheque':
            echo '<p><strong>Please note:</strong> Your order will be cancelled if we do not receive payment within 10 days.</p>';
            break;

        case 'cod':
            echo '<p><strong>Please note:</strong> Full payment is due immediately upon delivery to receive item(s). <em>Cash only, no exceptions</em>.</p>';
            break;

        // any other payment methods
        default:
            echo '<p>Please look for "Madrigal Electromotive GmbH" on your next statement.</p>';
            break;

    }
}
add_action( 'woocommerce_thankyou', 'sv_wc_add_thankyou_payment_note', 1 );
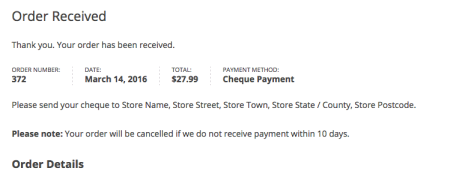
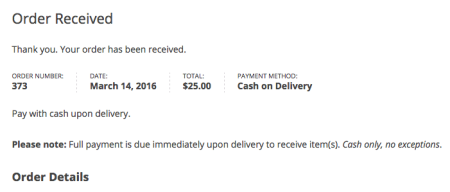
My check (or “cheque” for you non-Americans) and cash on delivery payments will output further instructions for the customer:
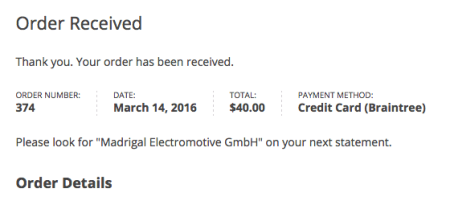
While other payment methods will show a default message telling the customer what company name is used for my merchant account and will show up under their transactions:
Within the order class, these class members can be set or modified, and then they’re accessible to you when you have an instance of the class to work with.
Example 2: Building a WooCommerce Upsells Shortcode
Now let’s take an example that we’ll break down from scratch. When we wrote about creating an upsells widget, we mentioned briefly that this example would be coming soon.
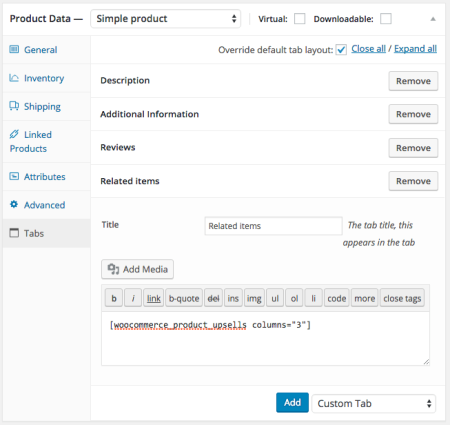
Let’s say you want to be able to output upsells with a shortcode — maybe you’re using WooCommerce Tab Manager and you want to output the upsells in a unique tab instead. You could do this with a shortcode, but it can be tough to use.
First, you don’t know when a shortcode is in use — there’s no such thing as is_active_shortcode() like there is is_active_widget(). Since you can’t check this, you don’t know when to remove the default upsells display and when to leave it in place (if the shortcode isn’t used on that page).
Second, adjusting the columns in the upsell display is simple — you’ll know when the widget is used, and then adjust the columns / CSS based on it being active. We can’t do that with a shortcode — we don’t know when it’s used, so we don’t know when to adjust the upsell display.
As a result of these uncertainties, rather than doing something simple like this:
function my_shortcode_handler() {
    // the code that generates the shortcode output
}
add_shortcode( 'my_shortcode', 'my_shortcode_handler' );
We’ll generate this shortcode within a class. By treating the shortcode as an object, we can give it properties and methods so that these methods are only run when the shortcode is in use, providing a workaround for an “is active” check.
We won’t go completely through the process of creating a shortcode here, so I’d recommend reading this post first if you haven’t created shortcodes before.
Step 1: When is the shortcode “active”?
Our final goal is a shortcode like this:
[woocommerce_product_upsells columns="4"]
So we’ll have two major functions of the shortcode:
- outputting upsells for the current product
- adjusting the number of columns and the way they’re displayed
This is where our class member is going to come in. We need a way to (1) determine if the shortcode is in use (so we can make some CSS changes, columns changes, and remove the default upsells display), and (2) we need a way to check the number of columns in use.
When we want to set the shortcode up, it will be set up by a handler function. This handler function will have access to the attributes passed in (columns, in this case). If we want to change the number of columns displayed (and apply other changes) within the handler function, it’s going to be massive, and sticking multiple responsibilities within a function isn’t a great choice.
We’ll break up the responsibilities of changing CSS and number of columns among other functions. However, we need a way to access the number of columns passed into the shortcode, which is only accessible in the handler function (a pickle, no doubt about it!).
This is where the shortcode class member will come into play. We’ll use a $column_count property that’s set / modified in the shortcode function, and this way other methods in the class can access it.
// set the column count so we can get it if overridden by the shortcode
protected $column_count = NULL;
This can also double as my “shortcode is in use” check — if the column count is not set, the shortcode hasn’t been used, and we should not execute our other functions. That’s why this will initially be null, and we’ll only set it when the shortcode is “active”.
Step 1 complete: we’ll known when the shortcode is in use by whether the class member is set or not. This will double as our way to get the column count passed into the shortcode’s columns attribute.
Step 2: Build the shortcode
Now that we know we’ll use the $column_count member as a flag for (1) yes, shortcode is in use, do you copy? and (2) a way to access the column count being used, we’ll need to set this value in our shortcode’s handler function.
Here’s what our final function will be, I’ll break it down in a second:
public function render_product_upsells( $atts ) {
    // bail if we're not on a product page
    if ( ! is_singular( 'product' ) ) {
        return;
    }

    $a = shortcode_atts( array(
        'columns'   => '3',
    ), $atts );

    // only use the shortcode attribute if it's an integer, otherwise fallback to 3
    $columns = (int) $a['columns'] ? $a['columns'] : 3;

    $this->column_count = $columns;
    $this->remove_default_upsells();

    // buffer our upsell display and output it with a custom CSS class
    ob_start();
    ?><div class="wc_upsell_shortcode"><?php
        woocommerce_upsell_display();
    ?></div><?php

    // output the buffered contents
    return ob_get_clean();
}
- Make sure we only execute this code on product pages,
woocommerce_upsell_display()doesn’t take kindly to being called on non-product pages. - Get the shortcode attribute passed in, it should default to 3 columns.
- Set the
$columnsvalue — ensure that the user gave the shortcode an integer (and get it), if not, fall back to 3. (in case someone does something crazy like entering “three”) - Set that
$columnsvalue as the class’s$column_count - Also trigger that we should remove the default upsells on the product page since our shortcode is being output.
- Last, output the shortcode content (in this case, the upsell display). We’ll buffer it so it’s output properly on the page.
Whew, that shortcode handler is still doing a lot, but it’s better than stuffing all of the changes we want to make in this one function and blowing it up to like 70 lines. Now let’s talk about the rest of my shortcode class.
Step 3: Handle the product page changes
Notice we had a remove_default_upsells() function. Well, this one is easy. Since it’s only called in the shortcode handler, we can assume that the shortcode is being used when this method is called, and that method will just remove the default upsells:
private function remove_default_upsells() {
    remove_action( 'woocommerce_after_single_product_summary', 'woocommerce_upsell_display', 15 );
}
Now let’s move onto the last 2 things we want to do: adjust the number of columns (based on what the user has set in the shortcode, which is now saved as a class property), and adjust the CSS for upsells accordingly.
Now that we know $column_count will be set, we can check if it’s set, then execute our code if so. First, the column count adjustment:
public function adjust_upsell_columns( $columns ) {

    // bail if the column count is not set, it means our shortcode isn't in use
    if ( ! isset( $this->column_count ) ) {
        return $columns;
    }

    // otherwise, set the column count to our shortcode's value
    return $this->column_count;
}
Next, we’ll adjust the CSS depending on the column count. I’ll use it to set the width percentage for the columns.
public function adjust_column_widths () {

    // bail if the column count is not set, it means our shortcode isn't in use
    if ( ! isset( $this->column_count ) ) {
        return;
    }

    // set the related product width based on the number of columns
    // + give them some breathing room
    $width = ( 100 / $this->column_count ) * 0.90;

    echo '<style>
    .woocommerce .wc_upsell_shortcode ul.products li.product,
    .woocommerce-page .wc_upsell_shortcode ul.products li.product {
        width: ' . $width . '%;
        margin-top: 1em;
    }</style>';
}
Easy! That class member for column count is really doing work for us as both a conditional check for the shortcode being active, as well as a way to pass the shortcode attribute to other functions.
When we combine all of these, we’ll get a shortcode that lets us output upsells, removes the upsells from the default location, determines the number of columns to show, and adjusts column width CSS accordingly.
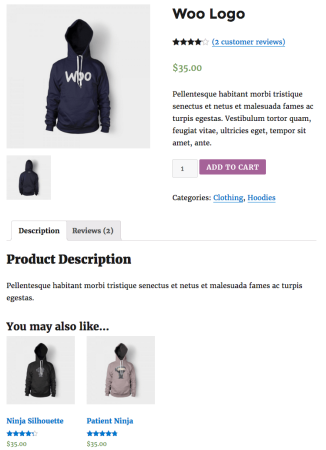
We’ll go from an original display like this:
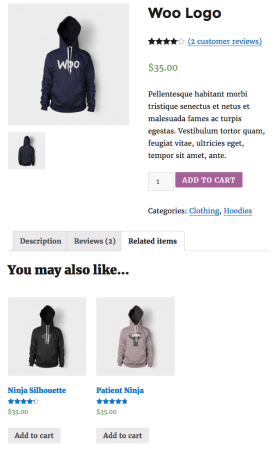
To being able to move this with a shortcode. Here’s an example of putting it in a custom tab with Tab Manager:
And that’s that. 🙂
Want to install this as a plugin, or take a look at the finished code? You can view the entire plugin code here, or click “Download zip” in the top right to get a zip, which you can install just like any other plugin.
Need some help taking this code further? We recommend Codeable for small custom projects.
[…] Here’s one for budding WooCommerce devs from SkyVerge: how to create a product upsells shortcode. […]
Hi, Beka! Thank you a lot! At last i found something really helpful.
I’m just a beginner in wp and woocommerce, so my question possible can be silly and not very clear, but i’m really frustrated and confused about where take such information.
So, back to the example 1:
“The payment method is a class property / member” and the shipping_methods are too when the order is placed? So how can i make the same – check what shipping method was used and add note on thankyou? how do i know what way to get shipping class as wc_get_order() got order_id?
The question much global: how do you find out where was generated some class and properties? how do you find out what hook to use for filter and action? for example, to change on checkout page order review in what way i should looking for?
Will be glad, if you will answer even on one question. First of all i’m interested to find out probably some scheme of working with woocommerce, because all the time i try something simple i get lost in all this files))thanks in advance
Hi there! Shipping methods are not saved as a class property. This was deprecated in WC 2.1 when multiple shipping methods could be used per order. You’d need to get them using get_shipping_method() and check if the one you want is in the array.
Usually digging through core code 🙂 Properties are declared in the beginning of the class, and for filters / actions it’s usually easiest to look through template files since there aren’t really comprehensive hook references.